STEM Day 2019 JavaScript Web Animation Activity
- Open Chrome or Firefox web browser and go to https://cs.mvnu.edu
- Under "Special Events", select the link for STEM Day on November 11, 2019.
Introduction to Animation with HTML5 and JavaScript
- HTML5 is the current language used to specify the content and layout of web pages.
- HTML5 has a feature called the <canvas> element that provides a standard graphics package in all current web browsers.
- Using a programming language called JavaScript, web developers can create moving objects.
- Here is an example of a simple animation using HTML5: Bouncing ball
- Here is another fun animation! MVNU Bouncing Balls
- And some simulations of physics: Gravity Simulation, Bouncing balls with different sizes, Ball Equilibrium
Step 1 - Draw a ball
- First we need to create a canvas to draw on.
- The following HTML code creates an area to "draw" on that is 500 pixels wide, and 400 pixels high:
<body>
  <canvas id="myCanvas"* width="500" height="400">
  </canvas>
</body>
- Now we can write Javascript code to draw something on this canvas:
<script>
  var context;
  function init()
  {
    context= myCanvas.getContext('2d');
    context.beginPath();
    // fill objects with blue color, using RGB value in standard hexadecimal code
    context.fillStyle="#0000ff";
    // Draws a circle of radius 20 at the coordinates 100,100 on the canvas
    context.arc(100,100,20,0,Math.PI*2,true); context.closePath();
    context.fill();
  }
</script>

<body onLoad="init();">
  <canvas id="myCanvas" width="500" height="400" >
  </canvas>
</body> - How can we test this out?
- We need an editor to write and save a code file. Go to the Start menu search box and enter "Notepad" to open either Notepad or Notepad++. Notepad is a simple text editor available on any Windows computer. Programmers often use other text editors, such as Notepad++, with more useful features for editing code.
- Copy the code shown in blue above and paste it into the editor.
- Use the File menu Save As ... command, and save the file on the Desktop with the filename "Ball1.html". Note: When using Notepad, change "Save as type" from (.txt) to "All Files".
- Go to the desktop, right click on the new file named Ball1.html, and select Open with ... Google Chrome.
- A web page should appear showing a simple blue circle.
Simple static ball:

Step 2 - Move the ball
- Now that we have the circle, lets try to move it. We'll do this by redrawing the circle many times, changing its position a small amount each time.
- Well replace the hardcoded values of the coordinates in the .arc method (100, 100 the first two parameters) with variables x and y.
- Each time we redraw the circle, we will increment the x coordinate by an amount of dx, and increment y by an amount of dy.
- Also since we need to redraw the circle multiple times, well move the code into a function called draw() and invoke it every 20 ms (milliseconds) using JavaScript s setInterval() function.
- Try the code below in the same way, saving the file as "Ball2.html". The new code is shown in blue.
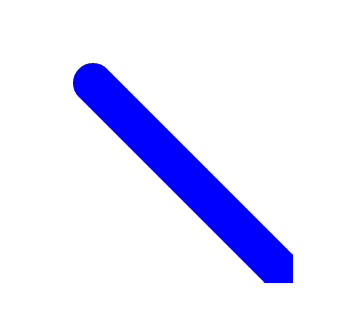
<script> var context; var x=100; var y=100; var dx=5; var dy=5; function init() { context= myCanvas.getContext('2d'); setInterval(draw,20); } function draw() { context.beginPath(); context.fillStyle="#0000ff"; // Draws a circle of radius 20 at the coordinates x,y on the canvas context.arc(x,y, 20,0,Math.PI*2,true); context.closePath(); context.fill(); x+=dx;We have a problem! The circle is actually forming a line (see the image below, click image for an actual demo).
y+=dy;
}
</script>
<body onLoad="init();">
<canvas id="myCanvas" width="500" height="400" >
</canvas>
</body>
Step 3 - Erase the old circles!
- The balls merged into a line because each time the draw() function runs, it draws a circle at the new coordinates without removing the old ones.
- To erase the old circles, well need to invoke a clearRect method right at the start of our draw() function so that it clears out the previous circle before it draws the new one.
- Edit your code from Step 2, and add just the one new line of code shown in blue below.
- Save the code file, and try it out as before. Now the ball should move across the screen and disappear.
<script>
var context;
var x=100;
var y=100;
var dx=5;
var dy=5;

function init()
{
  context= myCanvas.getContext('2d');
  setInterval(draw,20);
}

function draw()
{
  context.clearRect(0,0, 500,400);
  context.beginPath();
  context.fillStyle="#0000ff";
  // Draws a circle of radius 20 at the coordinates x,y on the canvas
  context.arc(x,y,20,0,Math.PI*2,true);
  context.closePath();
  context.fill();
  x+=dx;
  y+=dy;
}

</script>
<body onLoad="init();">
  <canvas id="myCanvas" width="500" height="400" >
  </canvas>
</body>
Step 4 - bounce the ball inside imaginary walls
- Instead of letting the ball disappear, let's see how to make it bounce and change direction when it reaches the edge of the canvas.
- All we need to do is check if the values of x and y are beyond the canvas dimensions, and if so, we need to reverse the direction of movement by setting the value of dx or dy to the opposite (negative) value.
- Edit your code to add the boundary conditions (shown in blue below), and try it out as before!
<script>
var context;
var x=100;
var y=100;
var dx=5;
var dy=5;

function init()
{
  context= myCanvas.getContext('2d');
  setInterval(draw,20);
}

function draw()
{
  context.clearRect(0,0, 500,400);
  context.beginPath();
  context.fillStyle="#0000ff";
  // Draws a circle of radius 20 at the coordinates x,y on the canvas
  context.arc(x,y,20,0,Math.PI*2,true);
  context.closePath();
  context.fill();
  // Boundary Conditions
  if( x<0 || x>500) dx=-dx;
  if( y<0 || y>400) dy=-dy;
  x+=dx;
  y+=dy;
}

</script>
<body onLoad="init();">
  <canvas id="myCanvas" width="500" height="400" >
  </canvas>
</body> - This link shows a working example: Bouncing ball
- This bouncing ball animation illustrates some fundamental methods used in programs to simulate moving objects. Similar animations are used in movies and game development, and with a little effort, this program could be extended to build a ping-pong or breaker-type of game.
Step 5
Now try some experiments by making small changes to the code in your file to see if you can produce some of these effects:- Make the ball move faster (by changing the number of milliseconds when using the setInterval() function).
- Change the size of the ball, or the dimensions of the area.
- Change the color of the ball whenever it hits the wall.
- Adjust the boundary conditions so that the ball changes direction as soon as its edge hits a wall, instead of compressing to the center of the ball.
- Draw more than one ball.
- Simulate the effects of gravity and friction (make the ball's height decrease with each bounce, and make the side to side motion slow down).
- Be creative, and try out other changes and see what happens!
Reference Links
This topic: Main > WebHome > StemDay2019
Topic revision: r2 - 2019-11-10 - RobertKasper
Ideas, requests, problems regarding TWiki? Send feedback